 |
| She's all done and just got a bath. |
 |
| Freshly stripped and painted with a professional enamel. This took a
couple weeks to complete. I used 2 gallons of aircraft stripper because the
previous owner had painted it with latex house paint and glue. The paint had to
be scrubbed off with steel wool after it sat in stripper due to the glue. FYI:
Stripper burns. It turned out great though. |
 |
| I took off the metal and replaced the rotten and warped cedar on the
sides and roof. To do a vintage trailer properly any interior panels have to be
replaced by removing the metal and then the cross-members. A shoddy restoration
with have new wood nailed over old wood which doesn't address any rot. Trailers
are built from the inside out. |
|
I took some rolled aluminum and covered the first vertical panel on
the door due to all of the dents. Before this I filled the holes and I used
epoxy to cement the panel in place. I also polished up the name plate and
handles which were painted. The chrome looks great against the red don't you
think. |
|
| This side door had fallen off so the old owner just screwed on some
gate hinges through the metal. He also attached a gate lock to the door by
smashing down the door trim. I remove both and straightened them out. I filled
the holes with body filler and sanded smooth. The utility door took 5 minutes to
straighten and reattach. |
|
| This is the stripped and sanded door. I scuffed all of the pinhole
dents and patched the holes. The area by the door handle was especially bad and
the bottom of the door was damaged. To fix this I bondoed all of the dents and
my dad suggested covering the first vertical panel with new metal. I took his
advice and lined up the edge of the metal with the first crease. I used epoxy to
adhere it and used paint cans to apply pressure for drying. After it dried I
bent the metal and epoxied the back. It turned out really nice as you can see
from the next picture. |
|
| I repainted the trailer following the original pattern.I also coated
the tong and installed a battery box and engineered a bottom mount propane tank
holder. |
|
| I coated the frame and crank in a hammered finish xylol based paint.
It is very durable and covers up imperfections well. My dad worked hard grinding
the tongue down, which made the paint look great. |
 |
| The old owner came to me in a yard sale and told me that he had
painted it with latex house paint and glue. This actually held very well, however
when you strip house paint with glue it turns into glue. This creates a bit of a
problem when trying to remove. Notice the dents in front. I hammered them out and
filled what I could. I also added extra cross members and new insulation to help
support the front. |
|
| It took 60+ hours to prep this trailer for painting. I had to remove
the glue/paint which took $80 worth of aircraft stripper. I sanded the entire
outside and had to wet-sand parts of it due to an unfortunate reaction with
homemade stripper. I even had to use a credit card as a sanding block to get in
the grooves. |
 |
| Just removing the paper after spraying. I used a high performance
rustoleum paint that I applied with my HVLP gun. It worked out well but not
perfect as I am not a professional painter. The primer was a metal etching
primer which is needed for aluminum to adhere properly. It put on 3 coats of
white and 3 coats of red. Notice that the trim is not installed. Look at the
final photo. The trim really adds that vintage flare. |
 |
| I sanded, primed and painted the wheels. I couldn't find the right
baby moon hubcaps, so I ordered a set from iowa80.com which sells semi parts.
they came with brackets that I riveted to the wheels. These tires came with the
trailer and they are almost new. I used some tire cleaner/polish to get them
nice and black. |
 |
| I hammered and filled what I could, but this trailer is 56 years old.
There are some dents in the metal but it turned out well. You can see in the
picture that the white paint is a satin and the red is gloss. This really helps
the red pop. |
 |
| Kyle worked hard cleaning the windows and Ethan and Jake wet sanded
the trim. They wanted some extra money and they worked hard. |
 |
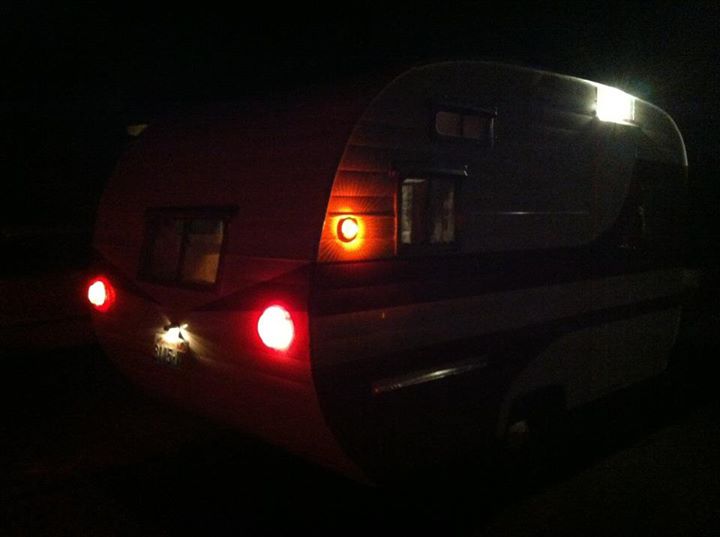
| The back had a couple of large dents which I hammered out and filled.
The arrows are part of the original design. I believe the tail lights are off of
a 50's Ford Galaxy though they fit nicely. The glass on the back had to be
replaced along with 3 other windows. The fellows at Community Glass did it
quickly and it cost less than $45. I always assumed glass was more expensive
than plexi, however plexi would have been at least $60 for the size needed and I
would have had to cut it myself. I also removed all of the old black weather
stripping and replaced it. 3 of the latches had to be replaced as well, so I
found a piece of galvanized rod at Coastal Farm & Ranch and fabricated them
using a vice, torch, grinder and file. I could have bought new ones, but it was
faster and less expensive this way. Best of all they work! |
 |
| Check out the lights. I got the side lights and door light from Stan's.
The door light runs off of the battery. I have also installed one 12v light
inside and fitted the trailer with a new 12v pump and poly 10 gallon tank. It
still has the old hand pump which works. |
 |
| The interior walls were stained a darker brown over the old lacquer.
This meant that instead of just sanding off the old lacquer I had to sand the
wood more. Since the old plywood is a thick veneer sanding did not damage it,
however it took about 60 hours of sanding. Notice the rotten wood on the sides
of the window: this had to be replaced. Take note of the cabinet hardware and
look at it refurbished in other pictures. |
 |
New panel in the front. What you don't see is the new cedar framing. I
replaced all of the old wood and added some extra cross members for
support.
 |
Finally finished sanding. This is just before putting on the poly. The new panels have been stained. We were ready for this moment. I used over a hundred sheets of sand paper and spent over 40 hours sanding.I used a Ryobi orbital and quarter sheet sander. I usually stay away from Ryobi tools but man these guys went the distance and still work great. To keep down the dust I attached a vacuum hose to back of the sander.
 |
| This is a picture before just after staining. I put on a 3/16 sub-floor before installing the laminate. Notice the stove insert. I had removed the old plywood and installed some new stuff. |
|
 |
| This is the first coat of poly. Watch is get darker and more brilliant. |
 |
Second coat of poly with the help of my beautiful assistant. The heat made it difficult to apply. We sanded between coats to smooth out the bumps. Melinda did the cabinet poly as well. She is amazing.
 |
| Meet the old floor. I would have saved it but it was really cracked in places. I covered it with a 3/8'' underlay and some new interlocking laminate. |
 |
| I took a piece of cedar and cut it to follow the contours of the wall and floor. The flooring is a new locking laminate (sorry the brand escapes me). We were originally worried about multiple wood tones but it looks great. I added a rubber foot on the original table leg. |
|
|
|
|
| The new poly gives the old wood a nice honey color. The lower front
panel was replaced when the metal was off. After I triumphantly came back from
Lowes with a stain that matched the old wood, my wife went back worked with the
pant guy for over an hour to get an actual match. Thanks Jeremy at
Lowes! |
 |
| The original table had a yellow laminate. I originally wanted to save
it, but in my haste I cracked it just before I got it off. So I built this table
out of birch plywood and red fur trim. It is coated in poly and looks awesome. I
achieved the curve with a jigsaw and made it perfect with a belt sander. I bent
the wood using glue and a large ratchet strap. |
|
| My son Kyle worked hard helping me sand the trailer. He is especially
proud of this cabinet and I am too!! This curved cabinet did not reveal its true
beauty until I put on the poly. It looked like we had over-sanded the entire
thing. However, when I coated it the nice Birdseye pattern revealed itself. This
picture does not do it justice. The old owner had removed the old hinges and
replaced them with some ugly black ones. I used the hinges off of the two
interior storage compartments for this door and replaced those with an inside
mount hinge. |
|
|
| The rounded cabinetry looks great and the reconditioned vintage copper
hardware really is a nice touch. Notice the trim on the walls. I bought a cedar
2x6 and sliced it up on the table saw. I gently rounded the edges and put a coat
of stain and ply. The original trim was just strips of birch laminate that fell
apart over time. The new trim (which also edges the floor) looks
awesome. |
 |
| These cabinets are the best part of this trailer. It is what makes it
stand apart from the ash models of the 60's and newer trailers. |
 |
The wood around the hatch was destroyed and bowed in due to the weight
of the cabinets. I replaced all of the 1x4 joists with 1x5's and added a couple
more. The thing with these trailers is that the wood has to be put in before the
ceiling joists. They are really laminated together. So I had to rebuild the
sidewalls as well. Lots of work.
 |
| See the yellowish patina on the hinges. This is lacquer from someone else's slop job. I stripped the hinges and used basso to bring out the copper. Now they really shine. To maintain the nice copper they need to be waxed or they over time they will acquire a nice green/brown patina. |
 |
| This is the old inverter. Though I am courageous I haven't tried to plug in this guy. The sidewall behind was rotten as well so I replaced it. Notice the light brown strip on the cabinet to the right. This is the original color and the brown is the stain. |
|
| This lower panel was too damaged to save so I replaced it. The old cushions were fine. I gave them a bath in bleach water and laundry soap. I like to let the water sit in the cushion for a while and then squeeze it out, rinse/squeeze, and let it air dry which takes a couple days so the chemicals can kill any potential smells. The original upholstery was brown and yellow. |
|
| I replaced the back panel with a new piece of birch plywood. Sanding is about to commence, though it went fast initially it took a lot of time to get the stain out from the previous owner. To check the color you can wipe the wood with mineral spirits. |
|
|
|
I used a wire cart to let the cushions dry. I gave them a chemical
bath and it took 3 days to dry.
 |
| The new and old wood look great next to each other. Melinda did a great job color matching the stain. Lowes was very helpful. They have a staining kit at the paint counter and they have tint-able stain. The curtains in the entire trailer are route 66 and the light is a vintage style light from. Stan's once again. I think the Wenatchee rule is if nobody has it Stan's does. Anyway, I wired up a rotary switch to the Stan's fixture and I attached it directly to the light. Melinda picked out the fabric and made the curtains. |
|
 |
| I had the cushions re-upholstered with micro suede and had them
embroidered with "Dalton". They are amazing. If you need an trailer upholstery I
know the lady. |
 |
| This bunk rolls up and will sit tight against the wall. It will hold a
person and/or storage. My boys worked hard to scrub the metal trim around each
window inside and out. |
 |
| The custom embroidery is the perfect accent to the new upholstery. The
thread used is a red sparkle. |
 |
| This stove top was severely pitted from rust. I called the guys at
Cascade Powder Coating in Wenatchee and they fixed it right up. We color matched
the white and the top was sandblasted and coated. It still has some bumps, but
it looks nice. While it was away I sanded and coated the area below the top with
a high temperature paint. The burned side splash I removed and put on some
aluminum sheeting for nice clean look and easy cleanup. I also replaced all of
the wood on the side and behind the stove with new sheeting. It had been damaged
by mice and moisture. The best part the stove top and oven
work! |
 |
| Even after sandblasting there was still some bumps in the metal,
however it still looks great. Powder-coating is great because it is very hard and
will withstand temperature up to 400 degrees. The new stove top looks great next
to the new upholstery. |
|
 |
| I left the original back-splash and counter. You can see the new stove
top and side splash (kind of) I also had to reattach the sink with larger bolts
and I sealed it up with silicon caulking. The counter and back-splash were both
cleaned and then we used Gel-coat to give it a nicer finish. |
 |
| This is the canvas bunk. It is part of the original design. I bought a
piece of painters canvas to recreate this bunk. It holds me (230iiiish). It is
double layered and double stitched. I also had the upholsterer put an extra 3' of
canvas that can be dropped down for a privacy curtain. The pillows are custom
made. They have a route 66 fabric with embroidered names of the cities on each
pillow. |
 |
| The top bunk pulls out to a 28'' wide bed and the couch pulls out to
48''. |
 |
| This bed is spring loaded and is 38'' wide. I had the back covered in
felt so it wouldn't scratch the table. Notice the copper plated hinges in the
cabinet. It took 3 hours to clean all of the hardware. Though I do like aging
they were coated in stain/lacquer from the old owner. |
 |
| Meet the upholsterer (mom). She is a seasoned sewer and works at
Andrew's Sewing and Vac in Wenatchee teaching classes among other things. She
has used sewing machines her entire life (she used to make her cloths and other
things). The memory of her mom (Grandma) gave her the inspiration to just do it.
Grandma would just figure things out like re-upholstering couches and my mom is
the same. She also did the custom embroidery work. If your looking to
re-upholster your trailer it will cost around $1500-$2000. |
|
|
| I took this light fixture and the one underneath the front cabinets
and coated them with a copper hammered finish paint. It really goes nicely with
the wood. The glass on this fixture is the same and the one above the sink. This
one got broken by somebodies head knocking off the metal bar from the bunk.
(oops) So I went to...Stan's and bought a new glass and I bought some wire clips
to hold the bars in place. |
 |
| Notice the roof. It was replaced and color matched and I put on a new
galvanized vent. I also sanded down the cabinetry and leveled out the countertop
which has slid down over the years. |
|


